PrepTest 58 (September 2009 LSAT), Game 4, gave a lot of test-takers trouble.
It's a Grouping: In-Out / Selection game, but it's not like most In-Out logic games. In-Out games often involve both of the following types of rules:
1. A ---> NOT B
2. NOT C ---> D
However, PrepTest 58, Game 4, only involves the first kind of rule, giving you a ton of "double-not arrows" to work with (read the post linked above if you don't know what those are). These make the game seem deceptively easy - it's actually a bit more complicated.
I consider this game to be the hardest out of the 4 in that section. In this blog post, I'll explain the game from start to finish.
Those of you who haven't seen this game before, please don't look at the rest of this post until the week before your exam. You'll want to save PrepTest 58 until then.
The rest of you, read on.
Also see: Explanations for Recent LSAT Logic Games
Due to LSAC's copyright rules, I'm forced to leave out certain details of the game. You'll need a copy of the exam in order to follow along.
First off, the rules:
H ---> NOT S and NOT M
If H is chosen (IN), then neither S nor M is chosen (so they must be out). This means if either S or M is chosen, H must be not be chosen. However, I wouldn't take the time to write out the contrapostive. I would immediately jump to diagramming it with a double-not arrow, as I have below.
The remaining two rules should be treated the same way:
M ---> NOT P and NOT T
W ---> NOT P and NOT S
The three rules can be diagrammed as follows:
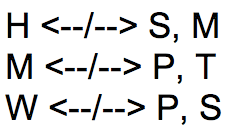
This means:
H conflicts with both S and M.
M conflicts with both P and T.
W conflicts with both P and S.
This means, among other things, that we must always lack at least one of H and S, one of M and T, and one of W and P. In other words, we must always lack at least 3 variables out of the 7 total.
Since the initial paragraph of the game also says that we must always have at least 3 variables in, this, when combined with the info that we must always lack at least 3 variables, means we will either have "4 in, 3 out" or "3 in, 4 out". ("4 in, 3 out" is demonstrated by the first diagram below.)
Of course, there are other pairs of variables that conflict with each other (pairs from which we must always lack at least one). However, I'm choosing these particular pairs because none of these conflicts overlap.
What I mean is - none of these conflicts mention the same variables - none of the variables are involved multiple times in the conflicts that I've chosen.
By choosing these particular conflicts out of all the conflicts mentioned in the rules, I can create the following 2 main templates / options:

Both diagrams indicate that we must always lack at least one of H and S, one of M and T, and one of W and P. The "4 in, 3 out" diagram is nearly complete because the conflicts I've chosen fill all the "out" slots, so everything else must be in, including L. The "3 in, 4 out" diagram is a bit more ambiguous because we still have 1 "out" slot remaining, and we don't know which variable will fill it.
It's important to remember that these diagrams don't address all of the rules - only the ones I handpicked. We still have to deal with a few conflicts, which are:

Let's keep these in mind as we go through the game.
Question 18
Typical List/Acceptability question
We're always going to lack at least one of H/S. Choice A violates this.
We're always going to lack at least one of M/T. Choice E violates this.
We're always going to lack at least one of P/W. Choice D violates this.
Looking at the conflicts not included on the diagram, we're always going to lack at least one of M/H. Choice B violates this.
By elimination, Choice C is our answer.
Question 19
Knowing that we must have at least 3 in and at least 3 out, the max we can have in is 4. We already know this from the inferences we made before starting the questions.
Question 20
If both P and W are out, our diagram becomes:

Choice A: We can't lack both H and L because L is definitely in. Eliminated.
Choice B: We CAN lack both H and M because there's no reason we can't have both S and T. This would create:
IN: STL
OUT: HMPW
This doesn't violate any of the remaining conflicts not included in the main diagram, so it's our answer.
I'll go through the rest anyway.
Choice C: We can't lack both H and S because there's only space in the out column to lack one of the two.
Choice D: We can't lack both L and M because L is definitely in.
Choice E: We can't lack both S and T because this would create:
IN: HML
OUT: STPW
H and M can't both be in because this violates one of the remaining conflicts not included in the main diagram.
Question 21
This is a local question asking what must be true if M is in. Remember that there are two major possibilities: having 3 variables in and 4 variables out, or having 4 variables in and 3 variables out.
In both possibilities, if M is in, H, P, and T will automatically be out. H and P will be out because M conflicts with both in the "remaining rules" not included on the main diagram. T will be out because we must always lack at least one of M/T according to the main diagram.
This fully determines the "4 in, 3 out diagram", creating:

This diagram is invalid because due to the "remaining rules," S and W can't both be in.
This leaves us with the "3 in, 4 out" diagram, which is a little ambiguous. We will again lose H, P, and T for the same reasons as above. However, there's still one more "out" slot to take care of. It's addressed by the fact that, in our "remaining rules", S and W conflict with each other. At least one of the two must be out, and since there's only one more "out" slot, whichever one of S and W isn't out must be in.
The diagram becomes:

In this diagram, L must be in, so L is our answer.
Question 22
The most efficient method here is to use previous work (previous valid scenarios).
In Q21's "3 in, 4 out" diagram, we could have lacked both H and S, so Choice A is eliminated.
In Q18, we lacked both L and W, so Choice C is eliminated.
In Q20's diagram, we could have lacked both M and P, so Choice D is eliminated.
In Q21's "3 in, 4 out" diagram, we could have lacked both T and W, so Choice E is eliminated.
By elimination, Choice B is our answer.
Question 23
We already know that M conflicts with H, P, and T. This means that the only courses out of the 7 it could ever be with are L, S, and W. Choice B says this, so it's our answer.
Choice B is just another way of saying something we already know, so if B is true instead of M conflicting with P and T, it'll have the same effect.
Photo created at www.addletters.com/bart-simpson-generator.htm


